Mosaic User Guide
Mosaic is a stylisation plugin that allows you to create Adaptive Tiling, Pixel Texturing and ASCII Effects. Mosaic supports Final Cut Pro X, Motion, After Effects and Premiere Pro on macOS.
Mosaic splits your footage into a set of tiles. Each tile is then mapped with an image fragment extracted from a motif called “Texture Atlas.” The result is a mosaic imitating the color, contrast, details and distribution of the original image assembled from a custom pattern.
The process operates on each frame of a video sequence and produces very dynamic stylised effects driven by the transformation of the original footage and affected by the plugin parameters.
Notice it is possible to apply the effects on a logo or a text rendered with a solid color by previously adding a gradient, noise or fractal noise effect to the footage.
Mosaic includes several procedural recipes but the most exciting looks will come from using your own texture atlas.
Quick Start
Applying Mosaic to a single clip
- Show the Effects Browser and select the Yanobox Mosaic category.
- Drag and drop one of the Mosaic templates to any clip in your timeline.
Applying Mosaic to a part of the timeline using an Adjustment Layer
- Download the free Adjustment Layer FCPX template
- Show the Library and select Titles/Adjustment Layers
- Drag the Adjustment title template to the timeline
- Show the Effects Browser and select the Yanobox Mosaic category
- Drag and drop one of the Mosaic templates on the Adjustment Layer
Applying Mosaic to a layer or a group
- Show the Library and select Filters >Yanobox
- Drag the Mosaic Filter to the destination layer in the timeline
Applying Mosaic to a layer
- Select a layer in the timeline
- Open the Effects menu and choose Mosaic from the Yanobox Folder
Loading a preset in a Mosaic Instance
- Select a layer with a Mosaic instance.
- Display the Mosaic Effects inspector and click the Browse Presets button
- Browse and select one of the presets from the window.
Apply Mosaic to a clip
- Select a clip in the timeline.
- In the Effect Pane, look for the Mosaic plugin in the Yanobox category.
- Drag the plugin over the clip.
Creating your Texture Atlas
What is a texture atlas ?
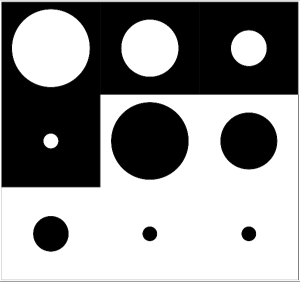
A texture atlas or motif is an image or a video loop containing footage aligned on a grid. Each cell can be a different image, graphic element, text or video loop. Mosaic optionally sorts the texture atlas cells by luminance to closely manipulate the appearance of the original footage. Mosaic allows for a texture atlas to have a grid with a maximum size of 16 columns and 16 rows, or 256 cells.
We recommend to tint the pixels of your motif to white and use an alpha channel to provide transparency. This setup will lets you customize the color of your motif on the fly using the Material Colors Group.
A very simple texture atlas made of abstracted shapes with 3 rows and 3 columns :
How to load your Texture Atlas into Mosaic ?
Open the Material Group to reveal its parameters and perform the following actions :
- Drag and drop your texture from the Project window to the timeline of your composition
- In the Material Group, set the Texture Menu to “Custom Texture”
- In the Material Group, select your texture from the Footage Menu
- Adjust the Column and Row values to fit the grid you used to create the texture atlas.
- In the Material Group, set the Texture Menu to “Custom Texture”
- Select the Footage Image Well parameter (this drop zone is located below the Material Group)
- Select an existing layer to assign its contents to the parameter.
- Adjust the Column and Row values to fit the grid you used to create the texture atlas.
- In the Material Group, set the Texture Menu to “Custom Texture”
- Drag and drop your texture into the Footage Image Well parameter (Material Group)
- Adjust the Column and Row values to fit the grid you used to create the texture atlas.
How to decide your texture atlas resolution ?
Mosaic use GPU acceleration to render the effect, depending of your graphic card you will be able to create your texture at a maximum resolution of 2048, 4096 or 8192 pixels.
How to decide about your texture cells aspect ratio and dimension ?
In the Mosaic plugin, the kind of resolved tilling where the cells perfectly fill the screen without being cropped is called Uniform Tiling. To obtain this ideal tilling the common cell width and height should be a subdivision or a multiple of the original image dimension.
Here is a trick to help in determining the cell dimension for any compatible ratio :
- In the Material Group set the Texture menu to “Graphic”.
- Set the Recipe Menu to “ Rounded Rectangle”.
- In the Material Group, select your texture from the Footage Menu.
- Play with the Width and Height Ratio Parameter to find and interesting ratio.
- Eventually adjust the Density and Adaptiveness parameter to visualize the tilling with different settings.
- in the Material Group Look at the Cell Size feedback parameter. These values indicate the actual dimension of one cell.
- Multiply or divide these values by the same number to produce a valuable cell dimension and ratio.
- Finally, assemble multiple cells of this dimensions on a grid to create a motif.
Extraction
The Extraction Group provides a set of basic luminance keying tools to manage the apparition or constrain the Mosaic effect to a particular luminance range of the input footage. Additionally this group supplies compositing options to blend the result in several ways.
Key - This menu switches between the two modes of extraction, Hard or Soft.
- Hard - Drives the apparition of the Mosaic according to a simple luminance threshold. Cells are turned on and off without intermediate values. Lighter pixels have more impact on the effect. The Invert switch reverse the priority to darker pixels.
-
Soft - The Mosaic is applied to a given range of pixels, based on their luminance values. Luminance values range from 0 (black) to 1 (white). The Luminance, Aperture and Softness parameters give precise controls to define this range :
- Luminance - Specifies the center of the range of pixels. For example, a value of 0.5 means that the effect is applied to pixels that are 50% bright.
- Aperture - Controls the width of this range. For example, a value of 0.5 with aperture of 0.2 means that all pixels between 40% and 60% brightness will be used as the source for the effect. An aperture value of 1.0 means that the effect is applied to the entire image. It may be desirable to have a smooth transition between the pixels that are within the range and those that fall outside it. This can be done using the the Softness parameters.
- Softness - Defines the width of this smooth border. By adding soft borders to the range (one at the start, one at the end) you eliminate the sharp transition. A softness of 1.0 means that the range is smoothed over the entire image.
Composite On - This menu gives several options to composite the final effect and set the background appearing across the textured cells (when setting the Extraction Threshold < to 100% ), through the transparent parts or mixed with the mosaic using the blending modes.
Note: This menu is hidden in After Effects, when the “Use AE Camera”option is activated and a camera exists in the composition. In this case, the effect is automatically composited on a transparent background.
- Color - Composites the effect on a coloured background with an adjustable opacity.
- Original Footage - Composites the effect on the original input image.
- Transparent - Composites on a transparent Background.
Blending Mode - This Menu appears when you set the background to “Original Image” and lets you apply differents blending modes. Notice you can invert the motif color with the Invert Color switch located in the Material Group to transpose the result of these blending modes.
- Normal - No blending mode is applied.
- Screen - Reveals the original footage through the black parts of the motif.
- Multiply - Reveals the original footage through the white parts of the motif.
Tiling
The Tiling Group controls the slicing and the adaptive aspect of the Mosaic. Two types of tiling are possible. When the Adaptivenessparameter is set to 0%, a classic tiling where all the cells have an equal dimension is achieved. With an Adaptiveness value superior to 0%, the algorithm starts to produce adaptive tiling with cells of multiple dimensions with an homothetic ratio.
Classic Tiling

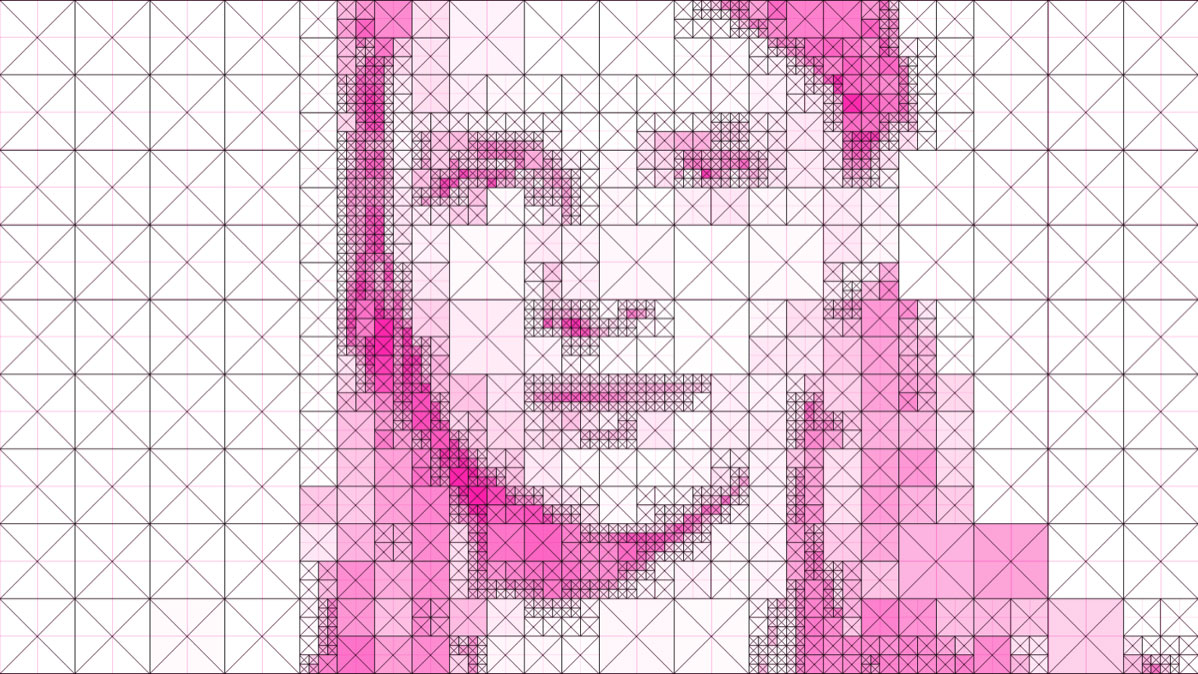
Adaptive Tiling
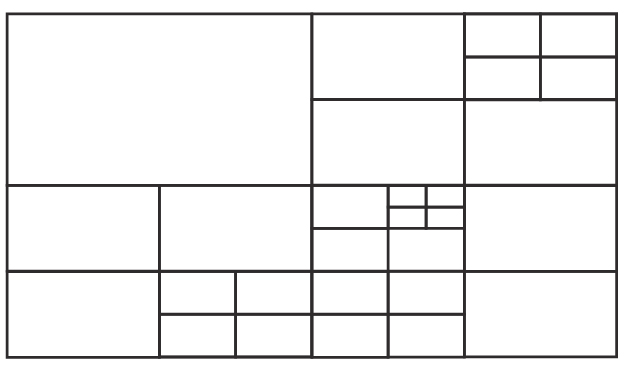
How does Mosaic adaptive tiling work ?
To decide the distribution and the cell sizes, Mosaic analyses the direct neighbors of a given pixel. If the neighbors have a near similar color, a large cell covering the region is generated. Alternatively, parts in the footage where pixel colors are different generate areas of smaller cells with their sizes adapting to the details of the footage.
Uniform - When activated, this option forces the tilling to resolve using only entire cells. It means the cells will not be cropped on the borders of the image or canvas.
Notice there are rare cases where the original image ratio and the motif cell ratio is incompatible and produce mapping deformation. Deactivating the Uniform option will fix this distortion freeing the borders of the image to crop the cells.
Recursivity - Sets the depth of the effect adjusting the grid resolution. Larger values generate more cells and more details.
Adaptiveness - Defines the range of cell sizes and gives priority to larger or smaller cells. For example, a value of 0% means more smaller cells of identical sizes. An adaptiveness value of 100% means more larger cells of identical sizes. All values between the extremes generate a range of different cell sizes.
Material
The Material Group provides the texture building blocks to Mosaic. When the slicing is done, the surface of the original footage is partitioned off a cell set. Each cell, according to its luminance, is then mapped with a part of given material. This type of material is called a “texture atlas” (a table of image cells) or a motif. Depending on the texturing mode, the atlas is procedurally created on the fly or comes from a footage loaded by the user.
Mosaic provides 3 different texturing modes : ASCII, Graphic and Load Footage with dedicated parameters. The Graphic mode on its own proposes several recipes.
Some of the parameters are available in all modes :
Sort by Luminance - Sets the rendering resolution of the texture atlas. Some of the built-in Motifs are procedurally generated up to 8192 pixels. The default texture size is generally 2048 pixels.
Max Texture Size - Sets the depth of the effect adjusting the grid resolution. Larger values generate more cells and more details.
Preview Texture - Displays the Texture Atlas ( motif ) used for the current frame. The preview reflects the changes of the following parameters : Sort by Luminance, Modify Menu and All parameters of the Material Colors Group.
Visualize Distribution - This option only appears when the Preview Texture option is activated and lets you see the luminance distribution of the texture atlas cells.
Modify - This menu lets you tweak the texture atlas adding columns and rows with white, black or a transparent color. This option is very helpful to modify the luminance mapping. For example, adding a white column of cells will increase the lighten range of the final mosaic image.
Cell Size - Display the actual dimension of the motif cells.
Texture - Custom Texture
The Custom Texture Mode lets you import a texture atlas footage you created (a table of image cells). If you need help creating your own texture atlas, read the "Creating your own Recipes" section.
Custom Texture - In After Effects and Premiere Pro, this menu lets you choose the footage used as a texture atlas (motif). In Apple Motion the import is done dropping media in the Image Well. In Final Cut Pro X the Custom Texture Image Well is located below the Material Group.
Columns - Lets you set the number of vertical cells existing in your texture atlas.
Rows - Lets you set the number of horizontal cells existing in your texture atlas.
Texture - ASCII
This mode uses a custom character set defined by the user to texture the tiles. It produces the old school classic ASCII effect (when adaptiveness is set to 0%) but also other looks colorizing the cells, or using the adaptive tiling feature. The motif colors are customizable using the Material Colors Group.
Font - This menu lets you choose a monospaced fonts available on the system or user.
Character Set - Opens a text editor to define a character set. Up to 64 different characters from the extended ASCII table are supported. Any space create an empty cell using the Fill Color as background.
Character Padding - Adds some space between the characters and the cell borders
Texture - Graphic
The Graphic Mode provides several Recipes based on procedural or bitmap textures. Some of the bitmap textures are included as inspiration ( example : Shakespeare) to help you in the creation of your own motifs.

Recipe - Rounded Rectangle
This recipe renders 4 cells with a simple rectangle of a custom aspect ratio. The roundness of the corners is modifiable. The motif colors are customizable using the Material Colors Group.
Roundness - Adjusts the curvature of the rectangle’s corners.
Cell Width and Cell Height Ratio - These parameters let you define the aspect ratio of the cells. The values indicate a subdivision of the original footage size.
Recipe - Random Square
This recipe applies a customizable pattern to the mosaic where black squares out the darken details of the original footage. Coupled with the different wireframe rendering modes, particularly the “8 Quads”, it produces an interesting crossword texturing effect.
Random Threshold - Adjusts the presence of black squares in the crossword pattern.
Random Seed - Modifies the random distribution of the black Squares.
Square Surface - This menu defines the motif resolution and sets the quantity of horizontal cells for the crossword pattern.
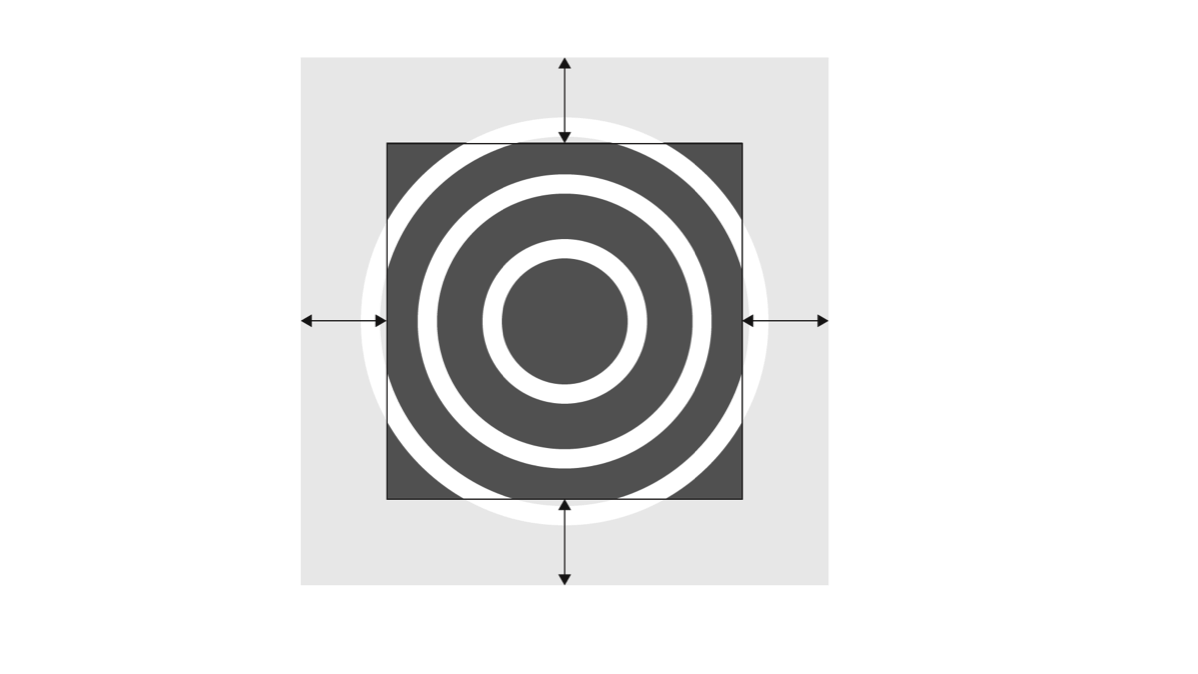
Recipe - Radio Waves
The Radio Waves recipe produces a radial or squared animated motif made of 4 cells. This recipe is procedural but is a good example of what can be achieved using a Texture Atlas based on video loops. The motif colors are customizable using the Material Colors Group.
The Time of the animation can be set to Automatic or Manual. Notice when using an animated motif, it is better to deactivate the Luminance Sorting option to prevent flashing redistribution of the motif on each frame.
Shapes - Sets the geometry of the motif to Circle, Square or both.
Time - Switches to an automatic or a manual animation.
Uniform Time - Synchronise the time of the 4 weve Cells. Notice desactivating this option may result in flashing redistribution of the motif.
Speed - Controls the speed of the animation.
Evolution - Manually Controls the evolution of the animation.
Thickness - Circles and squares are rendered as stroke, this parameter adjust their thickness.
Frequency - Modifies the frequency production of the stroked circles or squares densifying the motif at higher values.
Thickness 2 & Frequency 2 - A second set of parameters to control the third and fourth cell of the motifs
Recipe - Luminance Values
Applies a squared transparent motif to the mosaic and display the luminance value of each region. Zero represents black and 256 pure white. This recipe is based on a Texture Atlas visible activating the Preview Texture option. The cell colors are customizable using the Material Colors Group.
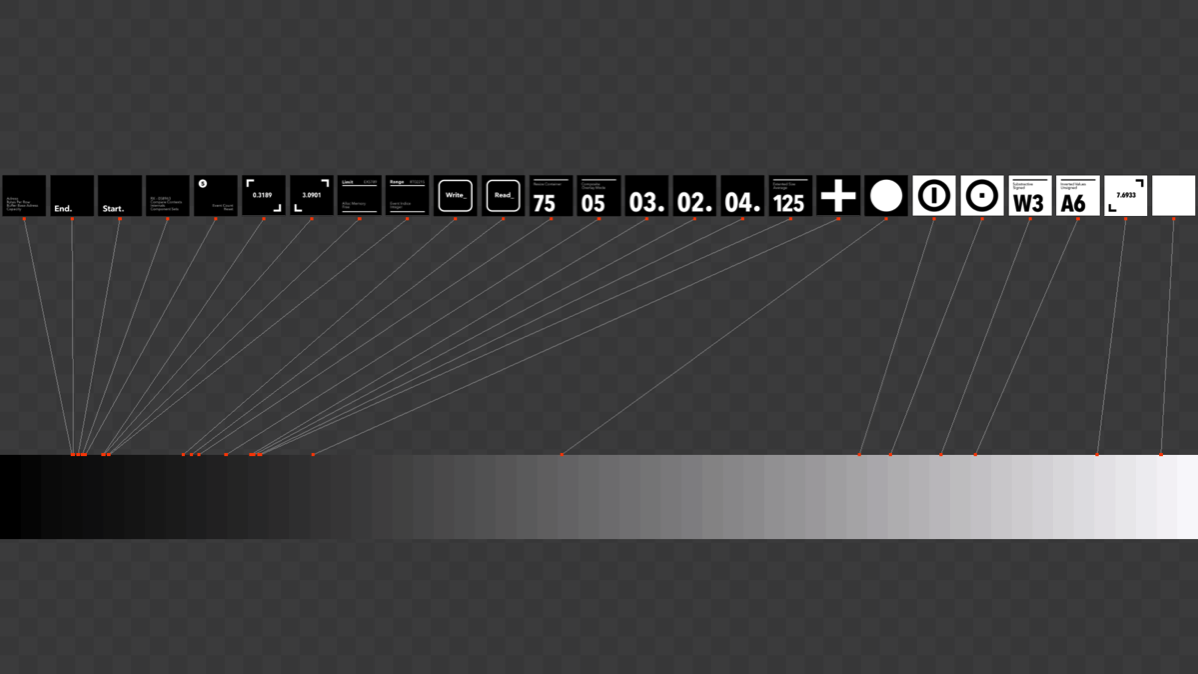
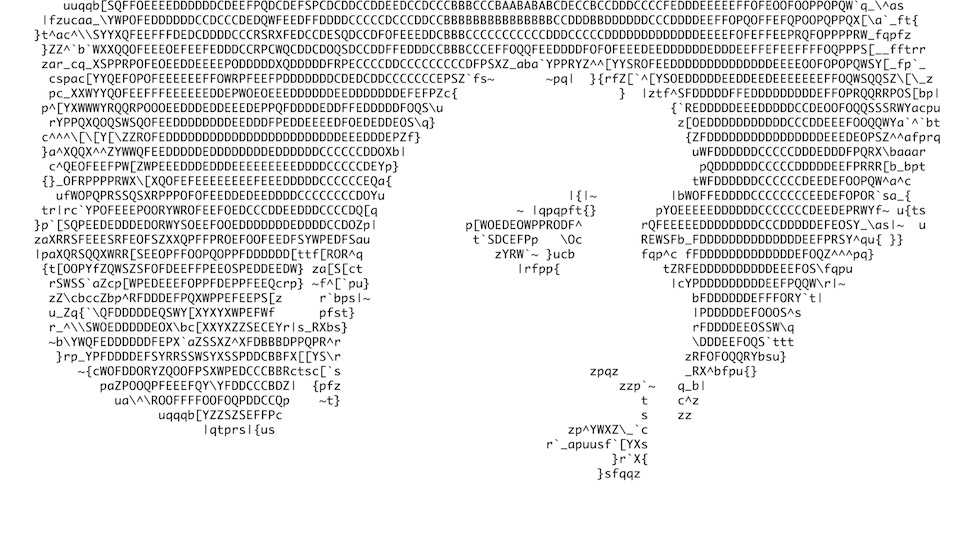
Recipe - Technical
Applies a technical motif to the mosaic. The texture Atlas is based on an assemy of graphic elements, numbers, texts and symbols. It is visible activating the Preview Texture option. The cell colors are customizable using the Material Colors Group.
Recipe - Circles
Apply an abstract geometric motif made of black and white circles on a contrasted background to the mosaic. It is visible when you activate the Preview Texture option. The cell colors are customizable using the Material Colors Group.
Recipe - Point Patterns
Apply a point pattern made of differents circles sizes. It is visible by activating the Preview Texture option.The cell colors are customizable using the Material Colors Group.
Recipe - Recipe - Cropped Typography
An assembly of light and bold cropped characters. It is visible by activating the Preview Texture option. The cell colors are customizable using the Material Colors Group.
Recipe - Recipe - Shakespeare
An example of motif created with assembled shakespeare sentences. It is visible by activating the Preview Texture option. The cell colors are customizable using the Material Colors Group.
Recipe - Recipe - Digits
A digital numbers motif. It is visible by activating the Preview Texture option. The cell colors are customizable using the Material Colors Group.
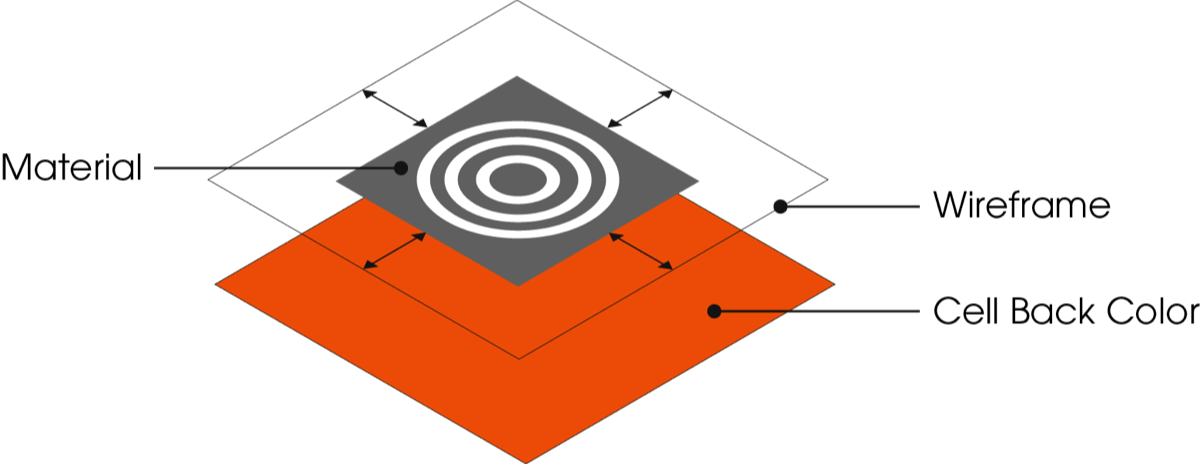
Material Colors
We would recommend activating the Preview Texture option (Material Group) when customizing the color of the motif, it helps to visualize changes more easily.
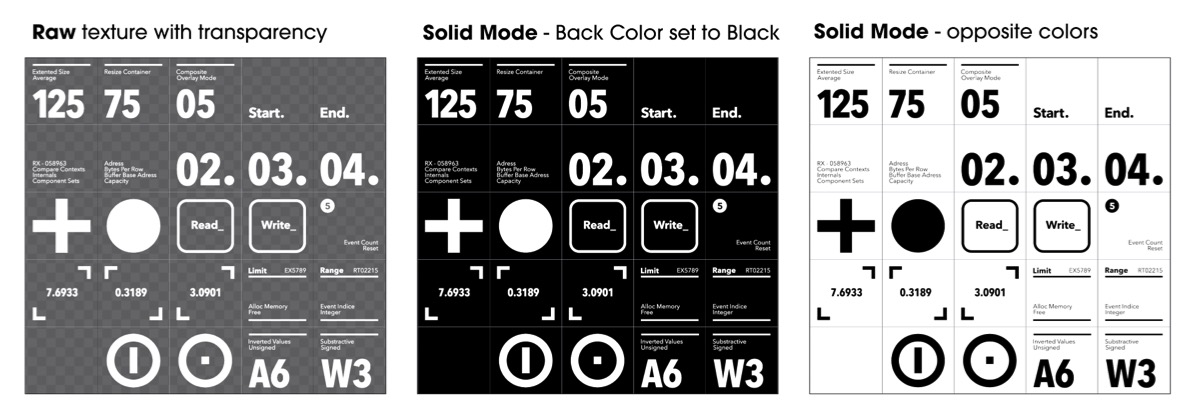
The Material Colors Group lets you customize the colors of the default and custom motifs. When the Color Mode is set to Raw, the original colors of the motifs or your own texture are untouched. When the Color Mode is set to Custom, new parameters appear and provide an interface to control the Front and Back Colors of the motifs. Ideally you should create your custom motifs in white on a transparent background.
Front Colors are applied to the opaque white pixels.
Back Color are applied to the transparent pixels.
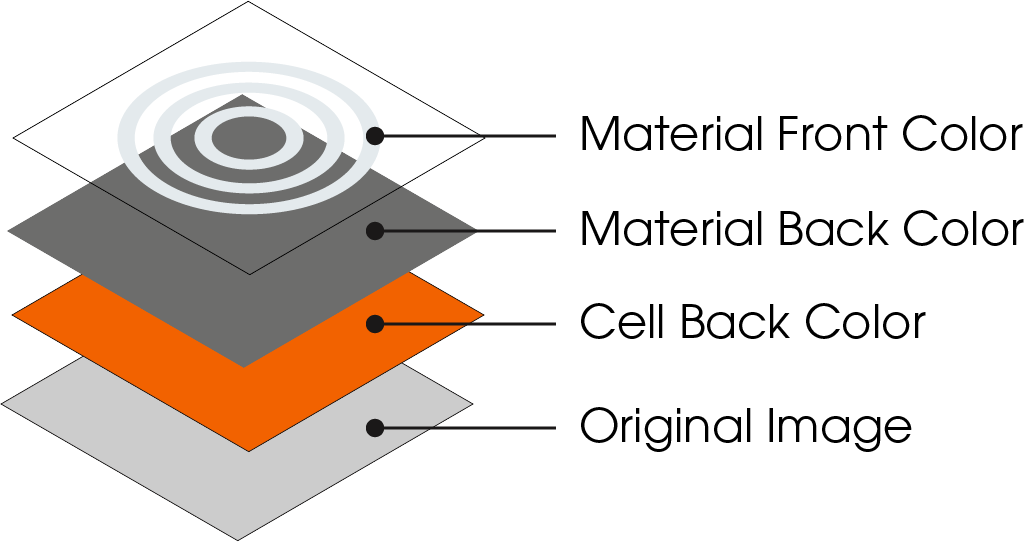
Notice if the Material Back Color is set to transparent, the Cell Back Color (Mapping Group) will appear through the transparent part of the motif. This feature lets you achieve complex color customization when for example you add Cell Padding (Mapping Group) to the motif.
In all Color Modes, the Colorize slider lets you inject the original image colors in the lighten part of the motif, means the white part of the motif will be fully tinted with the color of the original image.
Colorize - Tint the Mosaic mixing the texture and original footage colors.
Color Mode - Custom - Provides the interface to customize the motif colors. The Front and Back color parameters have 3 modes:
Solid - Apply a color to the front (opaque pixels) or to the background (transparent pixels).
Gradient - Apply a color gradient to the front (opaque pixels) or to the background (transparent pixels). In this mode, a Gradient Steps slider lets you adjust the distribution of the gradient.
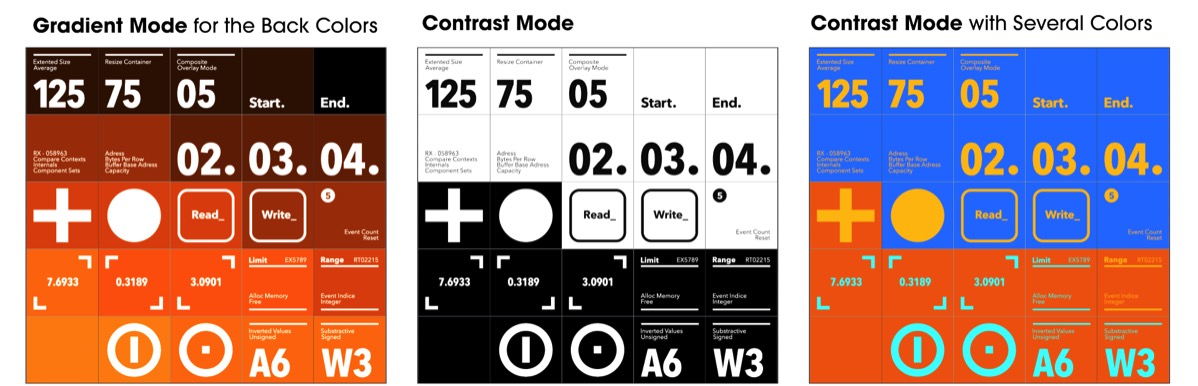
Contrast - Apply 2 differents colors to the front (opaque pixels) or to the background (transparent pixels). In this mode, the Gradient Steps slider lets you split the colors at a particular point of the motif.
When importing your own motif using the “Load Footage” ( Texture Menu of the Material Group ), 2 other parameters appear in the interface.
Create Alpha - Lets you create transparency in an imported texture atlas using the white or black part of the motif. This option helps to assign the Material Back Colors to the transparent pixels.
Invert Colors - Invert the colors of your custom motif.
Mapping
This Group manages the mapping of the motif with differents features and options.
Balance - This important parameter changes the distribution of the motif in the darker and lighter pixels. It allows you to add or remove details in the mosaic to better match the original footage. Animating this value creates interesting appearances of the motif through the image.
Add Noise - Adds some randomness to the distribution of the motif using Perlin noise to prevent agglutination of similar cells in the homogenous part of the image. This parameter also helps to spread the motif on a totally uniform image (solid color, text, logo).
Noise Amount - Adjusts the quantity of perturbation.
Noise Frequency - Sets the scale of the noise.
Noise Evolution - Frequency or scale of the noise.
Padding Destination - Assign the padding to the cell texture, to the wireframe or both.
Cell Padding - Adjusts the padding, shrinking the quad containing the cell texture. When the padding is greater than zero, the cell reveals a customizable background color.
Cell Back Color - This menu lets you assign the original pixel colors of the image or a custom color to the cell background. Notice the cell background only appears where the motif pixels are transparent or when using Cell Padding.
Background Color - Sets the background color appearing behind the cells.
Cell Index Offset - Applies a global offset to the distribution of the cells.
Texture Stretch - Dilates the cell texture upscaling the motif outside the cell region. This parameter has multiple purposes like removing unwanted borders or creating sliced graphics.
Cell Back Color - This menu lets you assign the original pixel colors of the image or a custom color to the cell background. Notice the cell background only appears where the motif pixels are transparent or when using Cell Padding.
Background Color - Sets the background color appearing behind the cells.
Wireframe
The Wireframe Group lets you add lines to the cells or render the mosaic as pure wireframe using the Solo Option. Notice an Anti-aliasing parameter is available in the Rendering Group. It is especially useful to smooth the diagonal lines drawn in some wireframe modes.
Enable - Activates the rendering of the wireframe overlay.
Wire Type - 8 types of wireframes are available through this menu.
- Quads - Draws a line around the cell.
- 4 Quads - Subdivides the cell with 4 wireframe quads.
- 8 Quads - Subdivides the cell with 8 wireframe quads.
- 2 Triangles - Splits the cell in 2 triangles and draw a line around their borders.
- 4 Triangles - Splits the cell in 4 triangles and draw a line around their borders.
- Diamond - Splits the cell in 4 triangles and draw a line around their borders.
- Crosses - Draws a wireframe cross at each corner of the cell.
Cross Size - Adjustable the lenghts of the crosses when selected as a Wire type.
Solo - Shows only the wireframe bypassing material rendering.
Line Thickness - Adjusts the stroke width.
Color Source - This menu provides several modes to colorize the wireframe :
- Color Picker - Lets you use a color picker to colorize the lines.
- Original image - Colorize the wireframe with the original image colors.
- Alpha From Mapping - Set the wireframe alpha from the Soft Key (Extraction Group) and Front /Background color opacities.
Line Opacity - Adjusts the line opacity.
Transform
The Position, Rotation and and Scale parameters all you to change the framing of the mosaic. It is sometimes necessary to change the Texture Resolution in the Rendering group to prevent a pixelation of the motif.
Mosaic natively supports the After Effects Camera. This allows for seamless integration with other industry standard plugins also compatible with the 3D environment offered by AE. This feature enables clever methods of layering to quickly create sophisticated 3D compositions with multiple instances of Mosaic.
Enable the Use AE Camera option at the top of the plugin interface to use this feature.
Position X,Y,Z - Sets the global position of the mosaic.
Rotation X,Y,Z - Applies a 3 axis rotation to the mosaic.
Scale - Changes the global size of the mosaic.
Rendering
The Rendering Group manages the anti-aliasing, Motion Blur and accuracy of the effect.
Anti - aliasing - Enable the hardware assisted antialiasing. this option is especially useful to smooth the wireframe diagonal lines ( triangle and diamond modes ) rendered by the Wireframe Group.
Motion Blur - Enables motion blur at different quality settings. The higher the quality, the more samples are used to render the final scene.
- Off - The scene is rendered without motion blur.
- Low - Renders a few samples per frame.
- Medium - Renders more samples.
- High - renders with the highest number of samples (slowest setting, highest quality).
Accuracy - Determines the resolution of the original image used by the adaptive tiling algorithm. Generally the normal mode is adequate for a correct result with an optimal rendering.